I love yogurt. Who’s with me? To be exact, soy yogurt is my favorite. As a child, I was introduced to soy yogurt by my Mom and instantly loved it. As a consequence, I grew up eating soy yogurt almost every day. Sadly, I haven’t had access to soy yogurt since moving to South Africa (from Belgium) in 2012 and have craved it every day since. Honestly, I’m not exaggerating.
I committed to taking matters into my own hands. Having done extensive research and testing to make the best possible soy yogurt at home, I’m excited to share what I’ve learned with you. In this post, I will share everything you need to know to make your own easy, creamy, cheap, high-protein, and calcium-rich soy yogurt at home!

Making soy yogurt is an easy 6-step process:
- Clean all your tools thoroughly
- Heat the soymilk
- Add the yogurt starter
- Incubate the yogurt
- Flavour the yogurt (optional)
- Refrigerate the yogurt
Aside from going through the 6-step process to make soy yogurt, we will go through the ingredients and tools you need to make soy yogurt happen at home. Let’s go…
This post is all about How To Make Soy Yoghurt!
Ingredients You Will Need To Make Soy Yogurt
Soymilk
According to food scientists, soybean is widely used for making yogurt-like products because of its high protein content and quality, its functional properties, and its good attitude to be fermented. Sounds good, right?
More good news is that commercial soymilk is considered a good substrate for yogurt starters! This means that there’s no need to make soymilk from scratch to be able to make soy yogurt at home. Phew!
One benefit of using store-bought soymilk to make soy yogurt is that you can aim to buy calcium-fortified soymilk!
Using calcium-fortified soymilk to make soy yogurt, will result in calcium-fortified soy yogurt. This is a convenient and cost-effective way to consume more calcium – an essential mineral that many people don’t consume enough of! I can’t take credit for this idea. Jessica aka The Green Dietitian shared this nifty trick with me.
To give you an idea, the brand of fortified soymilk that I use for this recipe contains 300 mg of calcium per 250 ml serving. Considering that the National Institutes of Health (NIH) suggests a recommended daily intake (RDI) of 1000 mg of calcium per day for young adults, this soymilk can provide around 30% of the RDI of highly absorbable calcium.
How cool is it to have the assurance that 30% of your calcium needs are taken care of by simply consuming one cup of soymilk or soy yogurt? I think it is awesome.
Side note: if you want to learn more about how you can meet your calcium needs on a vegan diet, check out the Vegan Nutrition Cheat Sheet, developed by The Green Dietitian.
One more benefit of using store-bought soymilk is that it is already heat treated. The scientific community has proven that heating is essential to obtaining optimal soymilk yogurt texture.
Yogurt Starter
According to food scientists, fermentation is the key biotechnological process to making yogurt.
Dairy yogurt fermentation is conducted by a combination of Str. thermophilus and Lb. delbrueckii subsp. bulgaricus bacteria. These two strains of lactic acid bacteria (LAB) together represent a perfect example of a microbial mutualism.
Str. thermophilus provides anaerobiosis and other growth-stimulating factors (which creates the texture of yogurt), while the Lb. delbrueckii subsp. bulgaricus provides peptides and free amino acids as nitrogen sources (which creates the flavor of yogurt).
Good news! Non-dairy yogurt fermentation can be conducted with the same combination of bacteria as dairy yogurt fermentation.
The non-dairy substrates which have been successfully tested include oat protein concentrate, potato protein isolate, pea protein isolate, soymilk, coconut cream and modified maize starch, cashew “milk” and tapioca starch, and almond “milk” and tapioca starch!
The combination of bacteria that are able to conduct yogurt fermentation is referred to as a “yogurt starter”.
You can buy a yogurt starter to make soy yogurt (and other plant-based yogurts) at home! If you are in the US, you should try this yogurt starter. It contains Str. thermophilus and Lb. delbrueckii subsp. bulgaricus as well as Lactobacillus acidophilus, a beneficial probiotic strain!
Here in South Africa, I haven’t been able to find a yogurt starter that is non-dairy-based. Instead, I use cultured non-dairy yogurt. Cultured non-dairy yogurt contains the necessary bacteria to ferment non-dairy milk into non-dairy yogurt and can thus serve as a yogurt starter. My favorite non-dairy yogurts for this purpose are the cashew or coconut yogurt from the Yocos brand. They are both creamy and complement soy wonderfully!
Flavouring
Regardless of soy yogurt being most similar to dairy yogurt in terms of taste and texture according to food scientists, it does have a mild beany taste and smell. If this is something that you want to avoid, you can sweeten your soy yogurt with sweetener or jam at the end of the incubation stage.
Tools You Will Need To Make Soy Yogurt
Milk Thermometer
To prepare the milk for incubation, you will need to gently heat it. Ideally, you use a milk thermometer for this part of the process.


Yogurt Maker
I’ve found that a yogurt maker makes the entire process much easier and gives the most consistent result! You don’t need anything fancy. I bought one of my yogurt makers (I have two) second-hand for ZAR 90 (USD 5,79)!
I recommend using a yogurt maker that incubates directly into individual jars. This way you end up with yogurt individually portioned out for the week!

How To Make Soy Yogurt
1. Clean All Your Tools Thoroughly
When you tackle a fermentation project, you want to ensure that every kitchen tool you use is extremely clean. Consider even sterilizing your tools! You don’t want any bad bacteria to populate. Good bacteria only!
I like to sterilize all my tools and jars using a sterilizing fluid, typically used to sterilize baby milk bottles. I also sterilize all my kitchen surfaces, before making yogurt.
2. Heat The Soymilk
Pour the soymilk into a large saucepan. Gently heat the soymilk to 42-45⁰C (104-113⁰F).
You will need to use a milk thermometer for this part of the process.
3. Add The Yogurt Starter
Take the soymilk off the heat and whisk in the yogurt starter or cultured non-dairy yogurt.
The milk is now ready for fermentation!
4. Incubate The Yogurt
Add the milk to your yogurt maker. Allow the milk to incubate for about 12 hours!
You will need to use a yogurt maker for this part of the process.
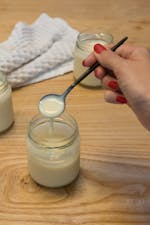
5. Flavour The Yogurt (optional)
If you wish to flavor your yogurt, you should do it after the incubation period.
I love stirring in one tablespoon of berry jam, or one tablespoon of maple syrup.
6. Refrigerate The Yogurt
Refrigerate the yogurt for at least 6 hours so it can cool and set.
How To Make Soy Yogurt
Equipment
- 1 whisk
Ingredients
- 1 litre store-bought soymilk I use calcium-fortified, mildly sweetened soymilk from the Alpro brand
- 1/2 cup cultured non-dairy yogurt I use cashew or coconut yogurt from the Yokos brand
Instructions
- Clean All Your Tools Thoroughly: Whenever you tackle a fermentation project, you want to ensure that every kitchen tool you use is extremely clean. Consider even sterilizing your tools! You don't want any bad bacteria to populate. Good bacteria only!I personally sterilize all my tools and jars using a sterilizing fluid, which is usually used to sterilize baby milk bottles. I also sterilize all my kitchen surfaces, before making yogurt.
- Heat The Soymilk: Pour the soymilk into a large saucepan. Gently heat the soymilk to 42-45⁰C (104-113⁰F).You will need to use a milk thermometer for this part of the process.1 litre store-bought soymilk
- Add The Yogurt Starter: Take the soymilk off the heat and whisk in the cultured non-dairy yogurt. The milk is now ready for fermentation!1/2 cup cultured non-dairy yogurt
- Incubate The Yogurt: Add the milk to your yogurt maker. Allow the milk to incubate for about 12 hours!You will need to use a yogurt maker for this part of the process.
- Refrigerate The Yogurt: Refrigerate the yogurt for at least 6 hours so it can cool and set. Store the yogurt for up to 7 days in the refrigerator.
Nutrition
Did you find this post helpful? Don’t forget to let me know, by leaving a comment below.
This post was all about How To Make Soy Yogurt!